
|
|

The original car
| Car : | Landrover Series 2A, Long-wheel base, Station wagon, 1971 model, 4-wheel drive. |
| Steering-Wheel : | Right-hand side. |
| Engine : | petrol 2.6 litres, 6 cylinders, side inlet valves. Original Landrover engine. |
| Gearbox : | 4 forward gears and 1 reverse gear, low- and high-range (10 gears overall). Synchromesh for third and fourth gear only. |
| Fuel : | rear tank of 85 litres and front tank of 45 litres. |
| Brake system : | drum brakes, two brake pads per drum.
Master cylinder with servo unit Two slave cylinders for the front wheels, and one for the rear wheels. |
| Carburator : | SU type, Stromberger. |
| Various : | car equipped with the double-metal roof to cool the air coming inside the car. The car had already a roofrack (which we had to fix though), and a spare wheel, as well as a rear-light when manoeuvring in rear gear. |
| Background : | we bought this car from a South-African dude, who inherited it from his father. His father deceased a few months before, and has been the only owner during all those years. The father was a fisherman, who used to go up the Namibian coast to go fishing with the car. |
| General condition : | the car was in very good general condition, especially considering its old age (30 years old !). There is no rust at all, no major leak and all was in good working condition, especially the engine which is still running perfectly. The gearbox of those Series 2A is renown for being a very good one. It squeaks and grinds, but it works overall quite well ! |
![]()
Modifications done or planned
Click on the link to see the the tab "Repairs and Fittings". Note that this will be updated later on.
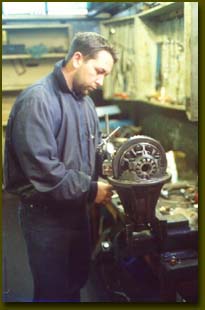
Carburator
The carburettor was leaking a bit from the bottom cover. We just bought a new kit, to replace the seals, o-rings, diaphragm, injection needle, gasket, washers. After installing this new kit, the carburettor was not leaking anymore. This was quite easy to do thanks to the Owner's Manual, and thanks to another technical book showing the procedure step by step. However, just make sure that everything works properly before mounting it back to the engine block (especially that the piston inside the carburettor moves freely after tightening the injection needle, by pushing up the piston with your finger through the butterfly entrance of the carburettor).
Brakes
Here as well, we bought and installed brand new seals and dust covers on every single slave brake cylinder (6 in total : 4 in the front sand 2 in the back), after making sure that the inside of the cylinders was smooth and free of any corrosion or damage (in which case it needs to be replaced or redone by a specialist if it is very bad). Apart from replacing the seals, we horned the inside of the cylinders with water-paper, to make sure it was soft and clean inside. Any damage inside the cylinder would lead to leaks. We initially replaced the seals on only two of the cylinders, but we realized that to get a proper running of the brake system, it is compulsory to do at least the two cylinders of each front wheel (and not one out of the two, even if only one of the two leaks) and that the best is to install a new kit in all the cylinders at the same ti8me. You can't take the risk of having your brake system failing along the way… It can be advisable to install a new kit for the master cylinder as well, because it happens that once you change the overall setting of your slave cylinders, the master cylinder needs to be overhauled as well.
Suspensions
Our car was very low at the back. We initially thought we would just retamper
the four leaf springs (two front and two rear), but after discussion with
many different people, and in particular to Saaymans Spring Works and Roverland,
we understood that retampering leaf springs was not a long-lasting and reliable
option, especially for a rough trip like ours. Moreover, depending on the
condition of the metal of the springs, it is not eve n sure 100% that the
retampering can work, which would be a shame considering the high price
of retampering springs.
As a consequence, we eventually decided to buy brand new rear leaf springs,
made by Saaymans Spring Works, with 9 blades instead of the usual 8, taking
into account the fact that we would be 5 in the car, and heavily loaded.
We'll if the ride is not too rough…
Dismantling the leaf springs is not very difficult, but requires to put
the chassis (and not the axle !!!) on stands. Make sure as well that your
bushes are in a good condition, because they are apparently prone to disintegrate
on African roads… We'll see with our front leaf springs bushes…
Make sure as well that your shock absorbers are working properly (by extending
and compressing them, the pressure should be even all the way, and a bit
more resistant when compressing).
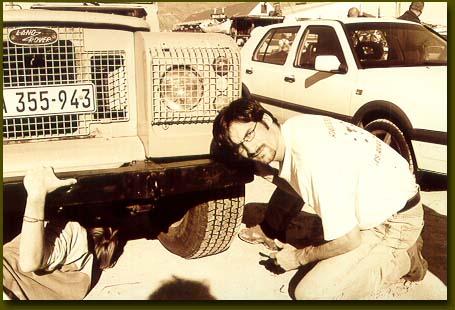
Propshafts
We checked both prop-shafts, front and rear. We had to replace both universal joints of the rear prop-shaft because they had too much play. The sliding joints of both shafts are not too bad, and we just packed them up with grease. We changed the oil seals located behind both ends of the rear prop-shaft (one in the transfer box and one in the rear differential). Little play is acceptable for the universal joint and the sliding joint, and can sometimes be fixed with grease.
Checking the rear dif in Roverland...
(Click on the photo to enlarge it)
Steering mechanism
We dismantled the two front steering rods (the horizontal ones linked directly
to the front wheels) to check the ball-joints. The two ball-joints of the
long steering rod had to be replaced. We initially had no ball-joint extractor
to pull them out the rod, so we tried by placing a heavy piece of metal
on one side of the ball-joint, and hammering strongly the other side. One
of them came out, but not the other three… We eventually borrowed a
ball-joint extractor, which made the job so much easier (just very easy,
actually, instead of being impossible and frustrating). For the other two
ball-joints, we just packed them up with grease. It can be tricky as well
to unscrew the ball-joints from the rods. Use a monkey-spanner and a vice
if you can, as well as an extension to increase your leverage.
Important tip : don't forget to measure the exact length of your rods before
dismantling anything, to put everything back as it was. Moreover, it is
advisable to leave the wheels as they are, as well as the steering wheel,
so that you just have to put everything back the way is was initially, without
having to find out about the right setting.
![]()
Spare parts bought or planned
Click on the link to see the the tab "Spares
and Consumables". Note that this will be updated later on.
Click on the link to see the the tab "Tools
bought or planned". Note that this will be updated later on.
![]()
Equipment
Click on the link to see the the tab "Equipment". Note that this will be updated later on.
![]()
Administration paperwork for the car
Having bought the car in South-Africa, and intending to take it through to Africa and eventually to Europe, we had to go through quite some administrative work :
Registering the car in your name in South-Africa
You need first to register your car to your name, for insurance and customs purposes when you cross borders. You must go through the following :
-
Roadworthy test
A roadworthy test is required if the last one done has expired. This can be done at any Vehicule Testing Station (Airport Vehicule Testing Station, Tel (021) 934 4900, note that they are opened very late, very useful when busy during the day).
Which means that before buying the car, you must make sure that you will be able to pass the test. Even for a very old car like ours, it is fairly easy, what they basically check is that the main safety features are working properly on the car, namely : foot- and hand-brakes, all lights and indicators, steering system. They check as well that the engine number and chassis number indicated on the previous registration papers correspond to the ones appearing on the car.
Note : our car was first and only registered in 1971 (single owner), when it was not compulsory to have the chassis number appearing on the registration papers. As a consequence, we had to get a police clearance on the chassis, done at the South-African Police Station Theft Unit, in Stikland (Tel (021) 945 3875. In our case, nobody has been able to find where our chassis number was, so the officer basically decided to give us a brand new one, with no difficulty.
As well, we had no safety belt and no warning lights (you know, when the 4 indicators flash at the same time) and we still passed the test without having to install those.
-
Get your registration number and your number plates
This is very straight forward once you have passed your Roadworthy test, you just have to fill in a form, pay for your registration fees and licence fees , and pay for your number plates (yellow or white !!!). Your are now legal in South-Africa !!!
![]()
Insurance of the car
Insurance of the car in South-Africa
This can be tricky if your car is old like ours, because not all companies will accept to insure it. We had to be clever and to use one of our personal relations to insure the car.
Insurance of the car during the overland tour
At this stage, we have found two companies in South-Africa accepting to cover this kind of experience :
-
Tough Sure Insurance (Tel 011 814 4409 / Fax 011 814 3909)
-
Cross Country-All Terrain Insurance (Tel 011 883 1154) (Website http://www.allterrain.co.za)
-
Another possibility we have heard of is Tuff Stuff Insurance (Tel 011 394 8235) but they apparently only accept more expensive cars (above R75,000).
An easy solution is to go through insurance brokers, which can negotiate the rates for you. You must expect around R 260 per month, to cover all sorts of risks (emergency repairs, replacement of the car in case of total loss, cover of standard equipment and accessories, passenger and third party liability, theft and hijack). We discussed with Carl Greaves Brokers (Contact Jean Barnard, Tel 021 919 0820) which has been very helpful and struggled to get us the best possible deal. Note that one of the requirements to get this kind of insurance is to have a level 4 immobilizer on the car.
Insurance in Europe
We haven't found out yet what we have to do for Europe, apart for the fact that we'll need to get a Green Card. We don't know yet how we'll get an insurance cover there.
![]()
Carnet de Passage
From what we have heard or read here and there, and from our discussion with the Automobile Association of South-Africa, a Carnet de Passage is compulsory for certain countries, recommended for others, and not essential for some others. It can be summarized as follows for our itineary :
|
Country
|
Carnet de Passage
|
| Namibia | Not useful, same customs area as South-Africa |
| Botswana | Not useful, same customs area as South-Africa |
| Zimbabwe | Not required, free temporary import permit at border |
| Zambia | Not required, free temporary import permit at border |
| Malawi | Not required, free temporary import permit at border |
| Tanzania | Required |
| Kenya | Required |
| Ethiopia | Carnet not in use, not sure about the cost / difficulty to get a temporary import permit |
| Sudan | Carnet not in use, not sure about the cost / difficulty to get a temporary import permit |
| Egypt | Required (300% import duties without the carnet !) but the AA decided to issuing it for this country in June 2001, further to a huge claim they had with this country !!! |
The reason for this Carnet de Passage is that certain countries impose amazing import duties when entering the country, that you are supposed to get back when you get out of the country with the car. Those import duties can be up to 300% of the value of the car in countries like Egypt !!! Those duties are meant to prevent people from selling their car in the country. Thanks to this Carnet de Passage, you don't have to pay for those import duties at the border, because the issuer of the Carnet commits itself to paying those duties should any claim arise from the country. As a consequence, the issuer of the Carnet requires from you a deposit, blocked on an account. Even though it means that you have to block this money (representing 100% of the value of the car), at least you do it once and get your money back when you have reached you final destination (provided you have an entry- and exit-stamp for each country you have crossed).
To get this Carnet de Passage, you must bring the following documents the Automobile Association :
-
Licence & Registration documents of the car
-
A valuation of the car done by a recognised 4*4 dealer/garage (they require between one and three different valuations and take the average)
-
Secure the deposit : you have two options, either you can get an indemnity form filled in by a bank (which commits itself to paying the money to AA should any claim arise) or you have to give the money to the AA (in which case you don't get any interest, contrary to the bank deposit). We had some difficulties to get the indemnity form, as Guillaume's bank (Standard Bank Thibault Square) refused to do it for our small amount (the deposit we required was R 11,750), as they only accept to do it for sums above R 50,000.00. We have then tried with the bank of Nicolas, Absa Bank, and the one of Damien, First National Bank, which eventually refused as well. We had to eventually give the money to AA, and lose 8 month's interests Too bad.
-
You must be member of the AA
It then takes 2 weeks for them to issue the Carnet de Passage. It can be quicker for an additional fee. The cost of this Carnet is :
-
Valid 6 months for 10 countries : R 1,075.00
-
Valid 12 months for 10 countries : R 1,302.00
-
Valid 12 months for 25 countries : R 1,535.00
You have to specify the date from which the Carnet will be valid.
Note that the AA of South-Africa decided to stop issuing a Carnet de Passage valid for Egypt in June 2001, further to a massive claim they had with someone in this country… Bad luck, we applied just after…
![]()
Other formalities
Note that it is advised to get the following as well :
-
International Driving Licence
Available through the AA, for R45 and one pictures, whether you are member or not of the AA, provided you have a South-African driving licence. I did not have one, and I had to renew my international driving licence.
-
International Certificate for Motor Vehicule
The AA offers to issue an International Certificate for Motor Vehicule, which is a translation of your car's registration documents, for R30.
-
ZA stickers
It is compulsory to indicate your country of origin on the car. Those stickers are available from the AA for R10.
-
Chevrons
Some border officials apparently require your car to display some chevrons stickers at the back of your vehicule. It is quite easy to find those big metal chevrons plates (for roughly R160), but we are trying to source stickers (hopefully lighter and cheaper to buy).
![]()
Entry in Europe
We don't know at this stage what the formalities are exactly to get in Europe, apparently you need to get a Green Card for free, provided you stay less than 3 months, but we don't know exactly how to get it.
![]()
Our main objectives with the car
Our main goal is to be totally independent, which means :
Mechanically
We have worked extensively on the car ourselves (to be able to do services and repairs on our own) : Guillaume worked regularly in a garage in Cape Town, mainly on Saturday mornings, thanks to the kindness of Andrew, of Mechanicar. And we all spent some hours on our own, dismantling and putting back together different parts of the car (carburator, differential, wheels, brake system ). We had as well a massive help from Roverland, in Montague Gardens, Cape Town, through loads of advices and spare parts. A very warmful thanks to David for his help !!! And just before we left, we had a full mechanical check-up of Lady Blue by the 4*4 specialist Safari Center, in N1 City, to make sure that everything was in order. We carry with us the required tools and spare parts.
"The way is long to the absolute knowledge, isn't it Guillaume?"
![]()
Fuel and water autonomy
We had two built-in original Landrover petrol tanks (85l at the rear and 45l at the front) plus several jerry cans. With this, we have a maximum fuel range of 1,000 km. We had to have a brand new rear petrol tank redone, due to the original one leaking on the rim (which is a very common problem on Landrover petrol tanks, because of the protection plate at the bottom, where water accumulates with time and provokes rust).
For water, we will carry 2x25L water tanks along with a water filtration unit (membrane 0.45mm) and purifiers (pills and/or chlorine).
![]()
Orientation and direction
We will use compass, GPS localisation system and detailed road and petrol station maps. We hope to be able to buy a cheap GPS system, which is apparently very useful for countries above Tanzania. The cheapest in SA is the Garmin E-Trex, costing around R 1,600 in places like Cape Union Mart or Makro. Note that it is apparently more expensive in France than in SA, especially considering that you possibly can get back the VAT when leaving the country. But our problem regarding the GPS is that it is pointless if you don't have the maps to use it. We still don't know how we will sort this out.
![]()
Recovery Equipment
We were thinking of getting a manual winch, but we are not sure about it anymore, because of the relatively important risks it implies. The major risk is that the metal cable snaps up, which can be a lethal event if the cable happens to hurt someone, with an amazing speed. We are not too sure if it is worth the risk and if we shouldn't rely on our hands and foot alone
Another very interesting system when you are stuck because of wheel spinning is called the Huby Trax system, which was actually used as a standard recovery equipment on old Landrover. It consists of a metal drum which you bolt onto your rim (front or back, but back is better because usually stronger), and to which you attach a static strap. You then attach the other end of the strap to a pole or a tree, and you drive. Thanks to the wheel spinning, the strap is wrapped around the metal drum, which pulls out the car. We have seen videos of it, and it was quite impressive. The system for Landrover costs around R 1,800 (Huby Trax Tel 083 631 6265).
Apart from that, the typical recovery equipment includes a kinetic strap and a tow strap (with shakles), sand ladders, Hi-Lift Jack and spades to get out of situations where we are bogged down. Regarding the sand ladders, we will probably make them ourselves, using aluminium angle bars (with a 900 angle) welded together (else it is difficult to find and very expensive). Those angle bars have a 25mm side, and are 6mm thick, we just hope it is gonna be strong enough ! And don't forget the gloves to avoid damaging your hands too much and too quickly !
![]()
Camping and other equipment
We will mainly stay at camping sites, catering for our own food, with our camping and cooking gear. We however plan the possibility to sleep in the bush, with a tent planned to fit onto our roof-rack. We should have three tents for the group, to enable a minimum (really a minimum) intimacy for existing (and future, who knows ?) couples (actually one existing couple, we'll let you know for the new ones).
We try to source cheap camping gear, looking in ads magazines, asking around, going to flea markets, because it is not really worthwhile to invest in such an equipment.
![]()